Showing posts with label Windows Server 2012 RC. Show all posts

Sunday, August 12, 2012

SharePoint 2013 - Step-By-Step Installation Guide

SharePoint 2013 - Step-By-Step Installation Guide

I started to make my own test environment  and installed SharePoint 2013 and created step-by-step installation guide in multiple parts.
I have a Dell-Studio-XPS laptop with decent configuration includes i7 Processor; runs Windows 7 Ultimate OS, 8 GB RAM, 500 GB HDD.  As on my laptop I have already SP2010 Installed and don’t want to uninstall it. So I decided to install SP2013 in VM environment using Windows Server 2012 RC2, SQL Server 2012 and SharePoint 2013 Preview
For setting up virtualization environment I decided to go with Virtual Box which is downloaded from VirtualBox.
Before setting up environment, please download following software’s.
1.       Virtual Box (https://www.virtualbox.org
2.       Windows Server 2012 RC (http://technet.microsoft.com/en-us/evalcenter/hh670538.aspx)
4.       SharePoint 2013 Server Preview (http://technet.microsoft.com/en-US/evalcenter/hh973397)
The whole installation process I have split in different parts as mentioned below

Part 2 - Installation and Configuration of Active Directory

Part 2 - Installation and Configuration of Active Directory

In earlier post we created a new Windows Server 2012 RC Image in VM environment with the help of Virtual Box software. Now the first step would be to installation and configuration of Active Directory.

Start your VM. As a default you will get the Server Manager window.

 Now click on Local Server from your left hand side. You will find that various properties for newly created server. You noticed that your computer named as WIN-M4AEH72CN9Q. Normally whenever Windows Server is created it gives a random name to the new server. Now the first thin is to give an appropriate name to the server. For this click on Computer Name as mentioned below Red Circle Box.
Click on Change and in next screen give the name, In my case I given as SP13-SERVER01. Click OK. After that you will ask to reboot your server, click OK.
Once server is restarted, you will again server manager welcome screen. Click on “Add Roles and features"
Add Roles and Features wizard will start, click Next.

Continue with “Role Based or feature-based installation selected” as default and then click Next.
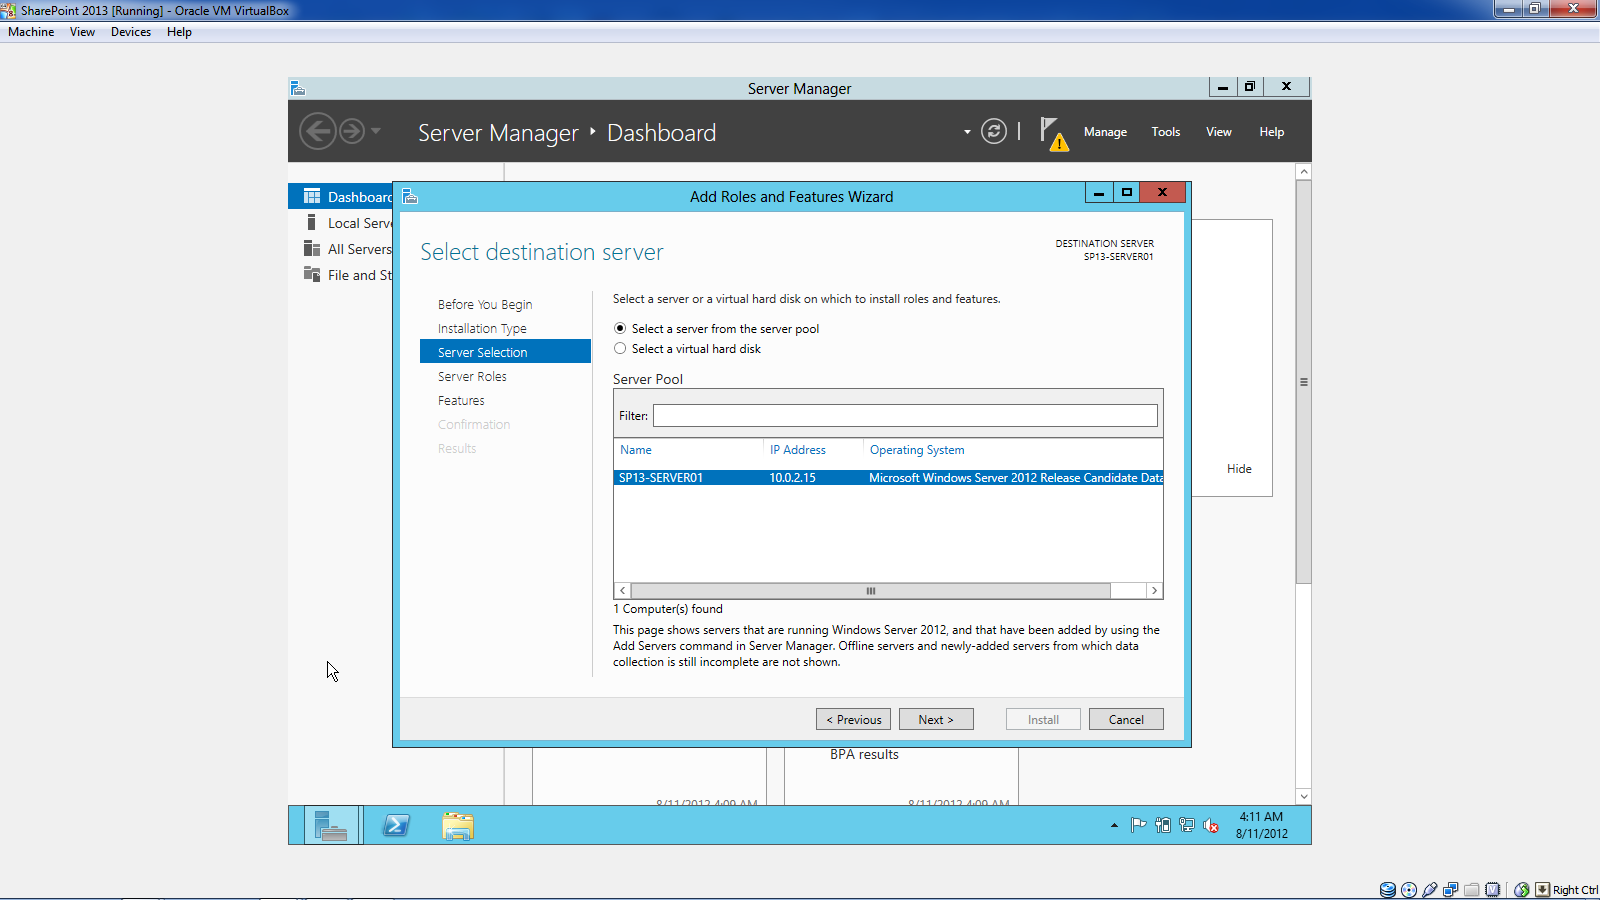
Select SP13-SERVER01 and click Next.
Select “Active Directory Domain Services” and click Next
You will be ask for features required for Active Directory services. Leave the defaults and click “Add Features”

Click Next.
Click Next.

Click Next.
Click Install.

Installation will start.
Installation is finished, click on closed.


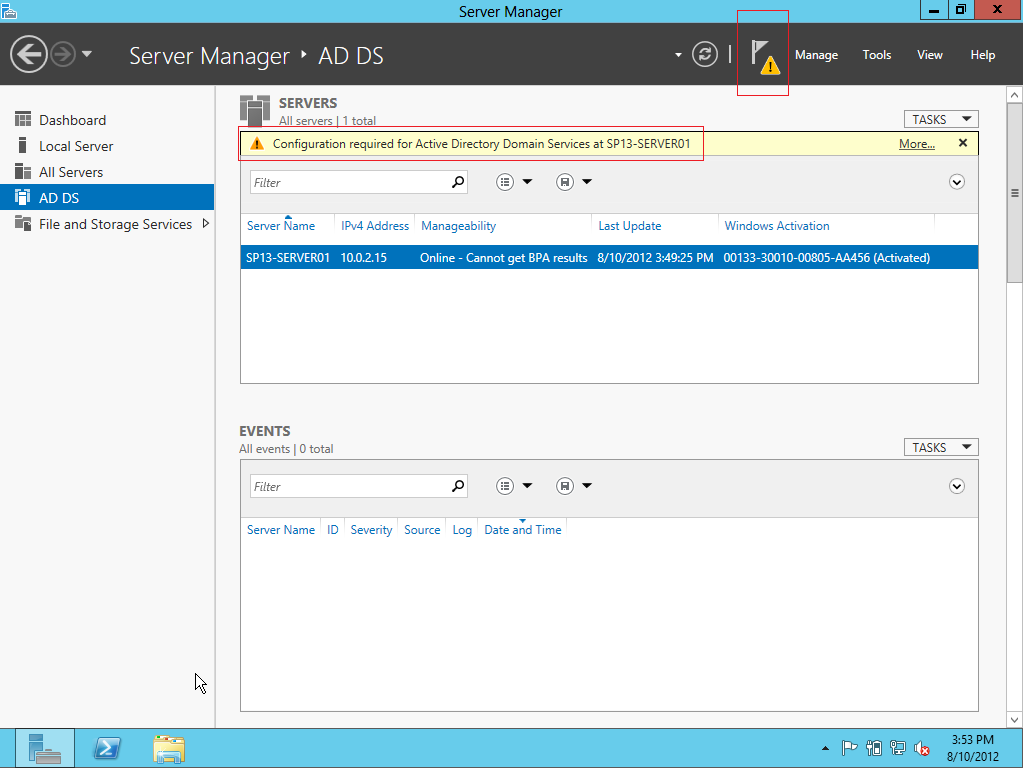
You will notice that a new option as AD DS is added in left hand side and also added a new section in Server Manager home. (see red line box in below picture). Now click on “AD DS” in left hand menu
You will notice that yellow warning is displaying on the top and also note the yellow flag on top bar. That means we have installed Active Directory Services Role on this server and now we need to configure.
Click on yellow flag on top bar and start the configuration wizard for Active Directory. Click on “Promote this server to a domain controller” as displayed below in red circle box.
Active Directory Services configuration wizard will start. Click Select.
Select “Add a new forest” if it is not selected then give “Root domain name” as “SP.LOCAL”. Press Next
Give some “Directory Services Restore Mode” password and click Next.
Click Next.
You will get NetBIOS name as “SP”. Click Next.

Leave the directories path as it is. Click Next. 
Click Next.

It shows you Prerequisites Check will start,
Click Install.

nstallation will start.
Once the installation will finish you will be signed off for finalization.

You will notice that now your fully qualified user name is “SP\Administrator.


Now your server is configured as an Active Directory Server with installed DNS.

Part 1 - Setting up Virtual Environment and Installing Windows Server 2012 RC

Part 1 - Setting up Virtual Environment and Installing Windows Server 2012 RC

Download the VirtualBox from https://www.virtualbox.org and download the software by clicking on the link as I mentioned in below image red line box.
Make sure that you have downloaded VirtualBox extension pack.
Now execute the installer and follow the wizard by clicking on Next..Next..Next. Then install extension pack.
Now start VirtualBox and click on New button.
Follow the wizard and give name as SharePoint 2013, Operating System as “Microsoft Windows”  and version as Windows 8 (64 bit) then click on Next.
As I have 8 GB RAM, so I have allocated 4096 (4 GB) RAM, you can setup as per your machine configurations. Now click on Next.
Select Create new Hard disk and click on Next.
Lets go with VDI and click on Next.
Select “Dynamically Allocated”. This allows your image auto grow as needed. Click on Next.
Select the size of disk as 60,55 GB, this  we can re-size the image later using VBoxManage utility. Click Next.
Review the summary  and click on Create.
You will notice that a clean image has been created. Please review the information which display on right hand side area.
Click on System Tab and then select Processor Tab. As I have 16 cores, so I have assigned 8 cores. Click OK to save.
Now click on start and First Time Wizard pop-up dialog will appear then click on Next.
Select the location of downloaded Windows Server 2012 RC Image. Click on Next


Review the Summary and click on Next.
 Now Image will start, set up your language, Time/Currency format and Keyboard format. Click on Next
Click on Install Now

Select the 2nd Option and click on Next.
Accept the License Agreement and click on Next.
Select 2nd option as mentioned below in Red Line Box.

Here you have noticed that in the next screen you will see the 60.5 GB un-allocated disk drive (which we have created during image creation in VirtualBox previously). Now click on Drive Options

Click on New
Click on Apply.
Click on OK.
Installer created two partitions. One is System reserved and another one where OS will be installed. Click Next
Installation is started.
 Installation will go step by step until it is finished.

Now enter your password for your Administrator a/c. Click on Finish.


For login your windows environment using Ctrl + Alt + Delete to your VM. This can be done from “Machine” in the menu option of VirtualBox.
Enter you Administrator a/c password which you entered earlier.
After login you will get the Server Manager Welcome screen. Now we have VM with Windows Server 2012 RC installed.

Now your Windows Server 2012 is ready.