Setup of your SharePoint 2010 site
· In Central Admin, create a new site. By default, this will use Windows Authentication. Since we haven’t setup FBA yet, we need to setup the Web Application first as a Windows site.
· Create the Web Application
· Create a default Site Collection, and make a windows user (below we’ve used the Administrator account) a Site Administrator.
Setup of your SharePoint User Database
· Configure SQL for membership store
· Create database
· Create SQL User
· Add SQL user to database
Configure SQL for membership store
· Setup the ASP.NET Membership Database. Note: You can use custom membership stores, DotNetNuke, even Live! credentials. But the .NET membership database is very simple to setup. This requires the SQL Server database. You can use the integrated version that is supplied with SharePoint, Express or a fully featured SQL Server (Standard or Enterprise) Edition.
· Find the setup file aspnet_regsql.exe located at either of the following locations depending upon your OS:
%windir%\Microsoft.NET\Framework\v2.0.5027
%windir%\Microsoft.NET\Framework64\v2.0.5027
· When the ASP.NET SQL Server Setup Wizard appears, select “Configure SQL Server for application services” as mentioned in below image, then click Next
Create Database
· Once you select to Configure SQL Server for application services, you will be prompted for the SQL Server name and database name. You can choose an existing database to add the membership elements to, or you can type in a new name and the database will be created for you.
· Above, I have named the database FBADB
· Click Next and Finish
Create SQL User
As an administrator, you’ll be able to add and modify user accounts. But from the SharePoint
runtime, we’ll have to provide access to the membership store. This can be done in two ways. If
using SSPI (Integrated Security) for the connection string from SharePoint, you’ll need to determine
the Service Account that runs the Application Pool. Then you’ll provide access to this windows (or
service) account in SQL Server to the FBADB database. Or, if you don’t want to use SSPI, or don’t
want to take the time to figure out the startup service account for SharePoint you can simply create
a login to the FBADB database. Following are steps for the second approach.
- Open SQL Server Management Studio (SSMS 2008) and select Security , then Logins
- Right Click Logins and Select “New Login”
- Create a SQL Server account. Below, we’d created the account FBAService with password as pw (you can use different password )
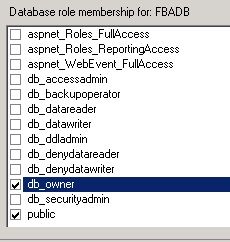
Select “User Mapping”
Mark the checkbox next to FBADB, and select the row.
In “Database role membership”, make the user a db_owner
Configure Central Admin Web Site to use SQL Membership Provider
SharePoint web sites out of the box are configured to use Active Directory. So you may be wondering why we’re configuring Central Admin to use FBA when we don’t really want to login in as an FBA user.
Well, we actually don’t want to configure it to to login as a forms user, but we do need to be able to add users from out membership database when configuring site collection administrators, and the like.
So all we want to do is tell the Central Admin web application to use our SQL membership provider as well as AD, so when you use the people picker to select users, it will provide results from our membership database.
Open IIS Manager on the WFE server (if more than one, then this needs to be done on every FWE that has Central Admin. The same goes for the proceeding steps for the other web applications).
Select the SharePoint Central Administration v4 site. On the Home Page, you’ll see many options for ASP.NET and IIS.
Open the Connection Strings Page. Under Actions menu on the right, select Add… to create a new connection string. Provide the details for the membership database for the new connection string.
Enter the Server (.), Database (FBADB) and the Credentials for the user FBAService (by clicking the Set button). If you want to use SSPI, simpy select “Use Windows Integrated Security” instead.
Click OK to save
Click to Select the Server from the Connections pane again, and double click Providers.
On the Feature dropdown, select .NET Users. Your machine may take a while to respond while the configuration is read.
On the Actions menu, click Add..
On the Add Provider form, select SqlMembershipProvider as the Type
Provide a name: FBA.
Drop down ConnectionStringName and select FBADB

Ensure you provide “/” in ApplicationName, why we need this, see Scott Guthrie’s blog. Then Click OK to save
From the Feature dropdown, select .NET Roles, then click Add.
Provide a name: FBARole, and select Type: SqlRoleProvider
Select the ConnectionStringName: FBADB
Ensure you provide “/” in ApplicationName, why we need this see Scott Guthrie’s blog. Click OK to save the .NET role.
To verify that all looks ok, we can check the web.config of the web application. to get to the right web.config, right-click on the web application under sites, and select Explore
In the web.config, you’ll see sections for the connection string and the providers. The <roleManager> and <membership> sections should look like:
- You should also see a <connectionStrings> section close to the bottom of the web.config file
Configure Secure Store Web Service to use SQL Membership Provider
Whatever exercise we did for Central Admin site, we are going to re-do for the SecurityTokenServiceAppliaation which is in the SharePoint Web Services application.
Redo all the steps as we did earlier for Central Admin
Create the connection string
Add the .NET role provider
Add the .NET users provider
Verify connection by editing config.xml
Setup the FBA Zone in SharePoint 2010
Ensure the Web Application is the correct one on the next page!
Change Authentication Type to Forms
Check Enable Anonymous (* note that this does not immediately enable Anonymous access; it merely makes the option available on the front-end web application *
Now we will have to configure IIS 7.0 for this FBA Web Site.
IIS 7.0 Web Site Configuration for SharePoint 2010 FBA Site
In IIS Manager, select the SharePoint site. In this example, we used the default site (80). Double click the .NET Users icon
- Click OK to save.
- While we’re here, let’s add our first user. This will be used as an administrative account on the FBA site. Click Add..
Select a User, Email and Password. Depending upon parameters you defined earlier you may be prompted with challenge/response questions. (** The password may require some strength by default. If you receive an error message that states the “password is invalid”, simply add a number or non-alpha character.)
Next, select the SharePoint Central Administration v4 web site from the connections menu in IIS.
Click .Net Users, then in the Actions menu select “Set Default Provider” and set that to FBA.
Set the User as Site Administrator on the SharePoint 2010 Web Site
In SharePoint Central Admin v4, go to Application Management
In the Site Collections section, select “Change Site Collection Administrators”

On the next page, select the Site Collection we’ve been using.
You’ll note that the primary site collection administrator has a little red squiggly. Why? We don’t have Windows Authentication enabled for this site and therefore no way to resolve. Delete the Administrator account.
In the field type the user created above (we used fbaadmin), then click the Check Names button. You should see a black underline noting that the name was resolved.
Now let’s test all this by trying to login. Browse to your site and select to login as a forms user login popup.
Login with the fbaadmin credentials and you should be able to access the site.
Access Denied Error Troubleshooting
If you get access denied error after entering the username and password, that means you are authenticated OK, but not allowing in the web site even thought you are site collection administrator.
Resolution
In order for you to use IIS Manager to manage your SQL users, you need to set the default provider to our Forms provider, i.e. FBA. In order for it to work we need to set it to the SharePoint claims provider. Go back to .NET Users and reset the default provider to “i” which is for the Microsoft.SharePoint.Administration.Claims.SPClaimsAuthMembershipProvider.
You should also check the default Role Provider for the web application and ensure that is set to “c”. If this is set to the SQL provider that you created, you will get an unexpected error after you logon.
OR